 Teacher Time-Saver: Sharing with a Google Contact Group | Save Time and Share Files Quickly with a Google Contact Group! Do you find yourself sharing Google Drive files with the same group over and over again? You may share with your collaborative team, your department, your staff, parents or even your students. Here’s a quick tip for sharing with groups: create a contact group. Instead of typing in a long list of names or email addresses to share, simply type the name of the group. This is especially helpful for secondary teachers with several class periods of students, and therefore this tip is particularly handy as your prepare for the start of the school year. Your Google Apps administrators may have even created these for you. But just in case this is not something you already have in your Googley “bag of tricks,” here’s how to create a Google Contact Group. |
1. Create and Name Contact Group:
Go to: https://www.google.com/contacts/
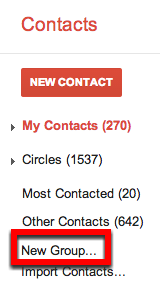
Click on, “New Group,” and enter the name of your new contact group. (For student groups, you will probably want to name by class period. You can reuse these groups year to year.)
Go to: https://www.google.com/contacts/
Click on, “New Group,” and enter the name of your new contact group. (For student groups, you will probably want to name by class period. You can reuse these groups year to year.)
 |  |
I typically work with teachers that are outside of my domain, so most are not in my contact list. I use a Google Form to collect their names and the email address associated with their Google accounts. (Note: for some this is a gmail address, but gmail is not required.) Once collected, I have a nice spreadsheet of everyone’s email address, and I can now copy and paste them to the contact group.
2. Add Contacts to Your Group
Select your new contact group from the left menu by clicking on the name of the group. The group will be empty.
Click on the add contact button at the top of the page.
Select your new contact group from the left menu by clicking on the name of the group. The group will be empty.
Click on the add contact button at the top of the page.
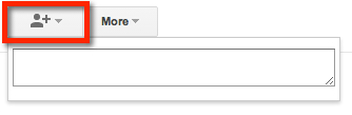
Here you can add users into the empty box. I copy and paste the email addresses from my Google spreadsheet, but you can also type them in manually. If these users are already in your contacts, these users will begin to appear as you start typing their name in the box.
After you have added the email addresses of the users you wish to add to the group, click “Add,” at the bottom of the box. Don’t be fooled by the size of this box, you can easily copy and paste a large number of email addresses. This is much faster than adding contacts individually.
After you have added the email addresses of the users you wish to add to the group, click “Add,” at the bottom of the box. Don’t be fooled by the size of this box, you can easily copy and paste a large number of email addresses. This is much faster than adding contacts individually.
3. Share with a Contact Group
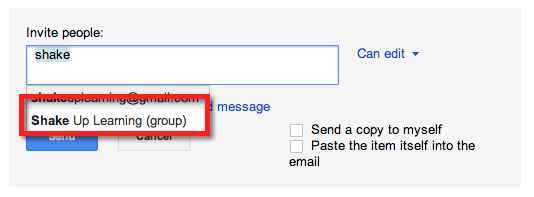
Now when you are ready to share files with your new contact group, simply start typing the name of the group (like you normally type individual names or email addresses) and the group will appear in your list. (Note: Sometimes this can take a few minutes to sync.)
Now when you are ready to share files with your new contact group, simply start typing the name of the group (like you normally type individual names or email addresses) and the group will appear in your list. (Note: Sometimes this can take a few minutes to sync.)
Setting up contact groups at the beginning of the school year can make the life of a teacher much easier! Here is a great video from Chad Kafka showing how this works in a Google domain.
How do you share with groups? There are many other great ways to do this. Please feel free to share you thoughts below.
Subscribe to this blog to get all the latest posts:
Subscribe to this blog to get all the latest posts: